What are forms, fields and field groups? How can I configure these myself?
A record tracks to the components that are implemented in Primero. The three permitted record types are cases, incidents, and tracing requests.
A field (data field) is information within a record. Fields are attributes like name, age, date of birth. Sometimes one field can be used to store several values like a list of protection concerns or all the languages spoken.
There are a number of different field types in which you can edit differently which we will walk through in the forms and fields configuration video.
A form contains a set of fields for a record, for example like the ones listed on the left hand side of the case record. By configuring the Primero application, you can specify new fields on a form, reorder the fields, or allow different forms to share the same field.
A Form Group is visible in the form navigation panel on the left side of the screen and can contain a single form or be expanded to show multiple forms. When multiple forms are added to a group, it becomes expandable and collapsible. For example, the Identity Registration form group includes all forms specific to the identity including the Basic Identity form. We will show you how to create a form, fields, and form groups in the form and field configuration video.
A form contains a set of fields for a record. By configuring the Primero application, you can create a new form, modify the existing forms, specify new fields on a form, reorder the fields, or allow different forms to share the same field. Forms are organized by components - Cases, Tracing Requests, and Incidents - and Modules - CP and GBV. When I go to the forms tab, this displays the settings for the forms that display in a case record. If you want to change the details for a specific form, you will go to forms and find the form you are looking to change.
A field (data field) is information within a record. Fields are attributes like name, age, date of birth. Sometimes one field can be used to store several values like a list of protection concerns or all the languages spoken. The same field can be ‘shared’ on different forms so that you can enter a date of birth on one form and see it on multiple forms. Fields can only be shared within a component, such as Case. A field cannot be shared across components, such as Cases and Tracing Requests. There are a variety of Field types that are available including:
- Text: basic free-response field that has a short character limit about 200 character (ie. name, agency, etc.)
- Text Area: basic free-response field that has a long character limit about 2000 characters (ie. notes or describing a child’s symptoms). This field will expand and you can differentiate between the text and text area fields by the hash marks in the bottom right corner
- Date
- Tick Box: 1 selection checkbox (tix box label is the display name of the box).
- Select Drop Down (single-select and multi-select): list of options which can be single or multi-select and you can search for options by typing into the field
- Radio Button: provided with 2 options where you can only select one or the other
- Numeric Field: numeric field
- Tally Field: only used for MRM and it will sum (ie. girls, boys, total)
- Date Field: The standard date format is dd-mmm-yyyy. In the json we have a validation that can be changed where this date cannot be in the future
- Date Range: beginning and end date
- Separator: form header to separate fields and help with organizing the form
Forms are created first and then the fields on those forms are added once the form is created. Forms can only be created or modified by a user with the appropriate permissions. The following sections describe how to configure the forms and fields within Primero.
It may be necessary to create a new form when the core set of forms does not satisfy the needs of documenting something within a case, incident or tracing request.
Its important not to change the field type or the database name of an existing field when editing. We generally recommend a Form Mapping exercise before making changes in the application so you have a record of their changes. You can export the Forms from the UI and then there’s a whole process to do that mapping which we can walk you through.
What steps do I need to follow to create a new form?
To create a new form, follow these steps:
- Navigate to the FORMS link in the top navigation bar.
- Within the Form Builder, select the proper form set using the drop downs for record type and module (i.e. Case and CP; Incident and GBV; etc.)
- Once in the proper form set, select the NEW FORM SECTION action button in the anchored header.
- Fill in the following information about the form:
- Form Name - this is the name of the Form that will appear in the List of Forms in the Left Navigation panel.
- Description - this a description of the Form and is not displayed
- Form Group Name - this is the name that displays in the Left Navigation Panel at the top level when forms are grouped. The Form Group has a dropdown carrot to the right of the name in the Left Navigation Panel. Clicking on this carrot expands or contracts the Form Group. To add the Form Group Name, you can select an existing Form Group from the dropdown list or add a new one. To add a new one, type the desired name in the box directly below the field and then click on the phrase ‘Click to add <form group name>‘ directly below that:
- The checkbox that says ‘visible for web app’ is required to be checked-marked if you would like to the form to appear in the web application. he checkbox that says ‘visible for mobile app’ is required to be check-marked if you would like the form to appear in the mobile application. You must have a form visible on the web application to display it in the mobile application.
If you want the form to appear by itself and not as part of a group at the top level in the Left Navigation Panel, you must enter same the Form Name in the Form Group Name field by using the instructions to add as described. The system will default to making this form visible. If you do not want it visible, simply uncheck that tick box.
Press SAVE when all the desired information is entered. Once you have saved the form, you can add fields to the form using the instructions below.
You can add translations for forms by selecting the language you require. You are required to create a form first in English. Thereafter you can add translations. Languages are translated in Transifex. Please view the video on Transifex to learn more if you require translations: https://youtu.be/bW4IvcyjleQ. Please note that translations are managed in Transifex via the development vendor and until a system administrator is managing their production environment, do not make translations in the forms translator.
To edit an existing Form, either find the name in the list of forms and click Edit in the options in the right column from the list view, or from the Show page, click the EDIT button at the top of the screen. You can hide forms by clicking on this check box. Click on the SAVE button once all the desired information has been changed or entered.
You must create and save the Form before you are able to enter the fields to be displayed on the form. Once you have saved the Form, you will see the following at the bottom of the form creation page.
How do I add fields to a form and a subform?
To add a field to the form, select the ADD button, the following will appear:
There is a SAVE button to save the changes to the field but you must also save the form after fields have been added. The left navigation panel in this window, lists the types of fields that can be added to a form (below).
Once a type of field is selected, the fields required to create that type of field will appear. All field types will ask for at least the following:
- Display Name - This is the name that will display on the form (for example: ‘name of the child’)
- DB Name - This is the name for the database field and what is used to store a specific fields value. This is like an address. If you leave this blank, the application will name the database field for you. This is important to note if you want to share fields between forms. For example, if you use the same DB name in a separate form, then it will appear in that separate form and auto-populates that field if it is filled out. Then, if you disable that field by selecting the ‘disabled’ checkbox, the user will not be able to edit it if it has been filled out elsewhere. For example, when a manager approves a care plan, then it will show as approved for the case worker and they are not able to change the status. DB names are required to be lower case separated by underscores without special characters.
- If you are adding a field that has multiple options then you are required to add either options or lookups if you are selecting a field that has multiple options (ie. the select drop down). You cannot enter both. The “Options” field is one way to configure the list of items that a user will see when they access this field. To add options, each option must be on a separate line. The Lookups field is a way to indicate that the list of items should come from a Lookup, which is a list of items that may be referenced by multiple fields. For instance, fields such as “Nationality,” “Ethnicity,” or “Language” have potential values that are consistent across Primero. The Lookup must be created before the field. See the section on Lookup Management for instructions. The “Multiple Selection” check box indicates if the user is allowed to pick more than one item from the list. If the box is unchecked, only one selection is allowed. In cases where there are a large number of options, the user will be able to begin typing upon clicking the dropdown, and options that match the entered text will appear. To select an option, the user can either click on an option or simply hit enter to choose the currently selected item. We will discuss lookups in further detail in the next video.
- Help Text - The help text will appear below the field and only in Edit mode. The help text is not visible when you are only viewing the record. This allows you to provide some guiding language to give the user a frame of reference for the proper answer or how to come to a conclusion based on information provided. Primero also has the ability to add guiding questions but these are added via the json with support of the development vendor. Note that guiding questions and help texts do not appear in the mobile.
- Visible - Use this indicator to have the field show on the form (check the checkbox to do this) or hidden on the form. You are required to hide unwanted fields rather than delete them. The exception is in the case of a field created in error or duplicated. Once a field has been in use, it is preferable to hide it rather than delete it.
- If you select hide on view page , the information will be displayed as asterisks’.
- If you are using the mobile application, the ‘ visible for mobile application ’ checkbox indicates that this form will appear on the mobile application.
- The show on short form check box will indicate that the form will display in the view/preview modal when searching for a case record that is not yours. Subforms will not display in the short forms. This is also the check box that controls what is seen on the mobile short form.
When you have entered all the information for the field, press the SAVE button at the bottom of the field modal to save the field. You must also save the form using the SAVE button at the top of the page.
Within a form there are two additional field types that are unique from other field types and they are used for different purposes:
- The Subform , also referred to as a Nested form, is a section of a form where a user can collect the same set of data for multiple occurrences within the same case, incident or tracing request. This is used throughout Primero to collect information where a case may have multiple follow up visits, protection concerns etc… For example, when recording a child’s living situation in the “Care Arrangements” form, a worker may fill out the same “Care Arrangement” subform each time the child’s current arrangement changes or how you add multiple family members.
- A Separator identifies a new section within the form. For example, on the ‘Closure’ form, a separator marks the address portion of the form to set it apart from the rest of the fields on the page. This is not a sub-form because you only need to enter information into it once.
A Subform is created in two steps, first you need to add the Subform field type to the Form where the Subform should appear. Second, click Edit Subform from the list of fields to add the fields for the subform.
[Note: Since the settings in the following two sections can only be set manually in the configuration bundle, these sections are only for developers working on the configuration bundle.]
To make a field required, a developer must manually edit the configuration bundle. To make the appropriate edit, the developer should search for the JSON object containing the field in question and then set the required attribute to true. This works for fields on standard form sections as well as fields on nested subforms.
Oftentimes, you will want to avoid having the user fill out a required on a nested subform when a case is first created. For instance, you may want to make it required that a user fill out the name field for each Family Details subform added to a case, but you also may not want to force the user to add information about family members when the first created. One way to fix this problem is to set a subform to start out with zero entries. This change also must be made manually in the configuration bundle by a developer. To make the change, the developer should search for the JSON object defining the subform in question. In this object, you should see the attribute initial_subforms. Set this attribute to the number of subform entries that should display in the forms when the case is first created. So, if we find the definition for the Family Details subform and, in this definition, set initial_subforms: 0, this will make it so that no Family Details subform entries initially upon case creation, meaning that the user will not have to fill out any of the required Family Details fields.
Subforms are suggested to not be selected to be ‘visible on the mobile app’ because if the parent form is visible, then the subform will automatically be included.
You can sort a subform by selecting ‘subform sort by’ and all subforms will display in ascending order of a specific sort.
If a parent form is visible then the subform will automatically be visible.
Similarly to creating a new form, you can edit an existing form to show, hide, or change existing fields. You should only change fields which are outside the core data set. This means the fields that are inherent to the Primero deployment when you first receive it should not be edited, but can be selected to be invisible in the form and field level forms.
- Navigate to the Form Builder using the FORMS link in the navigation bar
- Within the Form Builder, select the proper form set using the drop downs for record type and module (i.e. Case and CP)
- The existing forms will show in the list view. Find the desired form to edit, and click the “ Edit ” link in the far right column
- Once in edit view of the form, scroll to the field you’d like to edit, or add a new field as described earlier.
The functionality to change a field from one type to another is currently not supported. It is necessary to create a new field with the desired type and then hide the field you are replacing. To do this select the visible for web app check box or the hidden checkbox. Once it is unchecked it will not appear on the web application. If hidden is checked it will not appear on the web application. If you want the data in the existing field to appear in the new field, make note of the database name of the existing field. Create a new field with the proper type and use the existing database name. You will need to create a unique field label - the text that appears on the page. Once this is done hide the field you are replacing.
You may click and drag a single field to anywhere in the form to change the order in which they appear on the form. You must do this one field at a time.
While creating or editing a form, to add a new form group, type the name of the new form group in the field. The following will appear:
Use the mouse to click “Click to add” and it will create a new form group name
What are lookups and how do I create them?
“Lookup” is the term used for a set of values that might be used in the dropdown selection for multiple fields. For example, it may be more efficient to define the values for fields such as “Language,” “Ethnicity,” and “Nationality” once and then reference them for several fields throughout Primero. This will ensure certain data points are consistent and improve data entry speed and accuracy. Creating a lookup or a list of options is much faster than adding options manually for each form.
When you look at the lookups table, you will see a range of lookups already created. On the left is the name of the lookup and in the middle column is the various options of the look up.
To create a new Lookup, or a predefined list that you can update in one place:
- Navigate to the Form Builder using the FORMS link in the navigation bar
- Select the NEW LOOKUP action button in the anchored header. The following will appear:
- Add a name for the Lookup you are creating.
- Add a single option in each “Option” field adding new fields or removing as needed.
Once a Lookup is created, you can add to a field type and select whether you can pick one or more of the values.
To edit the properties of an existing Lookup, find the name and click Edit in the options in the right column. From the Show page, click the EDIT button at the top of the screen. You can also provide translations by selecting it at the top of the screen. You can change the translation, remove or add lookup values. You cannot provide translations when creating a new lookup. You must create the lookup first and then edit it to provide the translations.
If you change an option, then all options values will be renamed. If you remove a lookup value, then nothing will display in records where that option was selected.
Note that the look up option IDs are not editable in the UI but are editable in the json. They are important for global reporting and we try and keep IDs standard to make it aggregate data globally.
We highly recommend that you do not edit locations within the web application although it is possible. If you edit a location and its location code, it may impact the hierarchy already set up. You can provide translations for locations by selecting it at the top.
What is a configuration bundle? Does it have the forms and fields already configured?
Configuration Bundles allow you to export and import the configuration for a Primero instance, that means that Configuration bundles help you move your changes from one environment to another. This allows you to duplicate the configuration of one instance and can greatly simplify the setup of a new instance by exporting the desired configuration from an existing instance and importing it into the new instance. The Configuration Bundle includes all other data in the system except for the record data itself. Everything under the FORMS option from the main navigation bar and everything except Users under the SETTINGS option is included in the Configuration Bundle.
A bundle import will preserve any existing data that isn’t part of the import, but will overwrite data that is part of the import.
The user bundle is similar to a configuration bundle but instead it includes all users in a given instance.
To import and export the user bundle, click the link in the comments below to watch the video tutorial: https://youtu.be/V12CubqAJV0.
What can be edited in the json?
Primero is designed to be easily customizable but there are features and functionality that require development. Some of these features and functionality include:
- Configuring alerts
- Accepting/rejecting a case/transfer
- Completing a transfer request
- Filters
You can edit everything in the json if you are comfortable. However we are cautious about editing the json directly and always test things on a VM before putting on a live site. You can add guiding questions to a field in the json because you cannot in the admin UI. Here you can change the order of the forms.
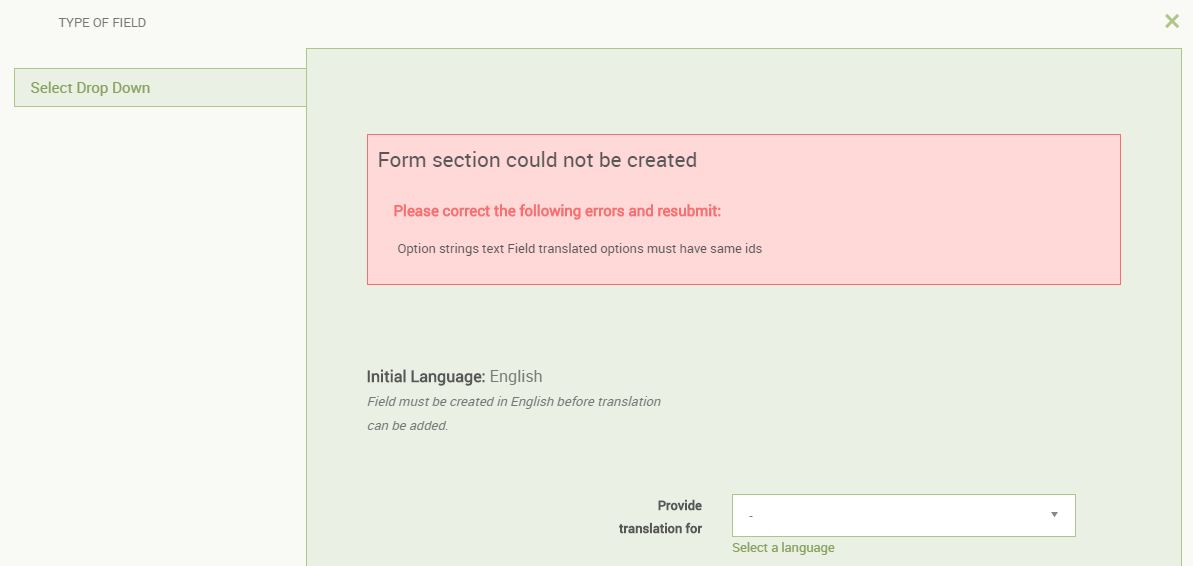
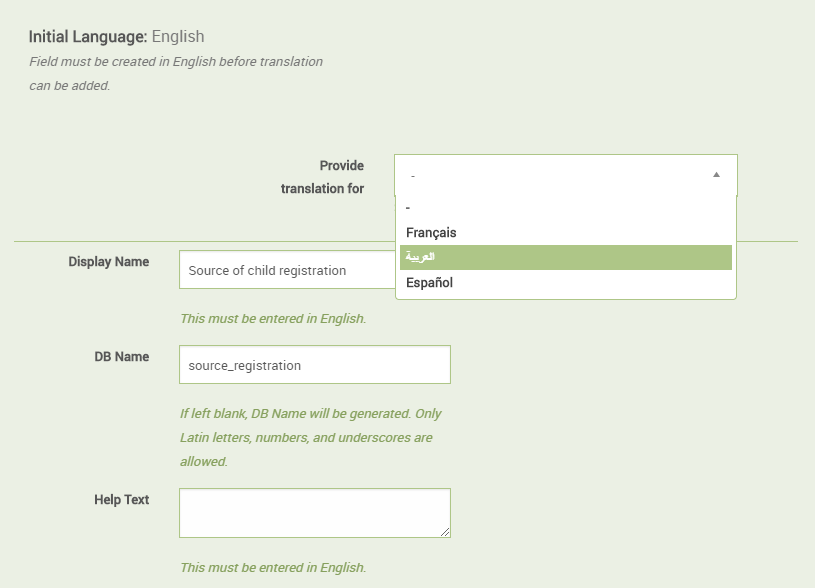
In this configuration, you have translations that are available. In order to add a new option, you are required to provide a translation for it as well. First select a language under the “Provide translation for” dropdown:
Then, enter the new option and the translation:
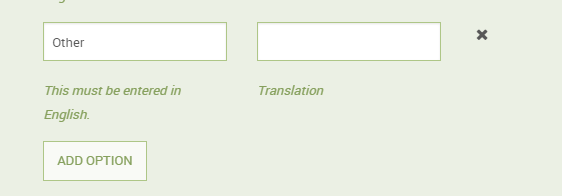
You should not receive any errors once you save the change.
Do you have globally standardized mandatory fields?
In the CMTF global Standardized forms we have mandatory fields. The new implementations will be using the global standardized forms.
Will you have a client satisfaction form in CPIMS+ in v2?
Yes for both the child and family of the child.